Friday, March 22, 2013

Back to basic! Bouncing ball and walk cycles

Sick day at home.  Slept all morning.  Fed myself lunch, now my brain is feeling hungry.  Before I passed out again, let me fed my brain with something delicious.

So I am going back to the basic again!  Recently I got a web link that listed a lot of animation worth revisiting.  That's a great idea!  Not only to see how much you have grown and how your style have changed, but also revisit some of those golden rules of animation, and use it with the knowledge I have gain from iAnimate.  Freakin awesome right?!

Ok so here it begins!  The first thing I did was bouncing ball.  Laugh out loud not!  I actually reviewed something that I forgot.  

When the ball hit the ground, we all know that there should be a contact pose before it squash right?
OK! I got that. what about the pose that leaves the squash pose?  Should it be the red one? Or should it be the green one??  According to animator survival kit, it should be the green one.  "You see the change here and then the ball is off again. "

What about a character that's jumping?  "You want to keep the feet on the ground when he takes off, it will give more change to the action. "

Super interesting!  Now onto walk cycle!

Friday, February 3, 2012

Long forgotten love.

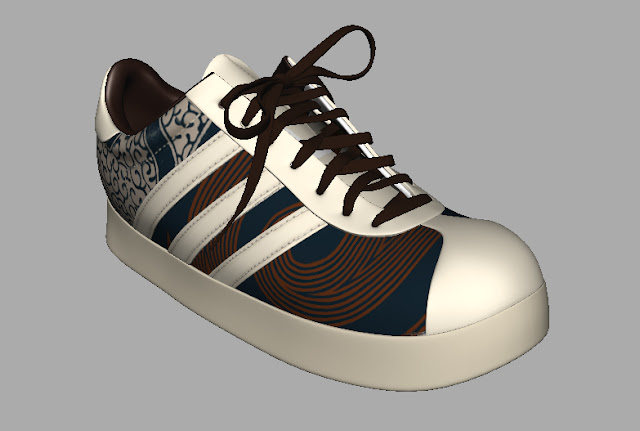
I like how some project reminds me some skills that I haven't used for a long time.  I was reminded today how modeling can be fun at times.  So when I got home, I dug out some old model I did before, but never got a chance to finish it (zBrush is so frustrating to me!). Still very proud of it!  I just need to learn Mudbox or Zbrush to give the sneaker more detail. (How many things are on my learning list!!)  Yeah.. one day I will. lol  (burying it back...)

My lovely adidas sneaker!  Just the right one.  The left one have a different pattern on it. 

Monday, January 30, 2012

AFR stretch and squash controller icon

Rigging a bouncing ball's squash and stretch control right now from AFR.

This reminds me of a command "parent -s -r".  It does the same thing as our usually parent command.  Its just that in MAYA in order to reparent shape node under another transform node, we need to "type" in command.  The usually drag and drop in outliner or hitting p won't work.

So the same thing, choose the child(ore children) then the parent (remember to freeze scale first...), then run the command "parent -s -r".  This way we don't need to parent the curves under the disc ctrl, then make them reference. Save some time!

Thursday, January 26, 2012

Moving on to the next Rigging class - AFR!

I have finally finished the rigging tutorial on Digital Tutor a few days ago.  It is a real good beginner video like I said in earlier post.  But I feel the rig that I have used in the professional world can do more than that.

So I did some research on what I should look into next.  I found this book being recommended by a lot of artists out there, "Body Language : Advanced 3D Character Rigging" , also the series of video AFR(Animator Friendly Rigging ) by Jason Schleifer.


By Eric Allen & Kelly L Murdock
AFR by Jason Schleifer

After reading about Jason Schleifer's About section on his website. I decided to go for AFR first.  He started out in Alias talking and promoting MAYA, and moved on to Lord of the Rings Trilogy, and by the end , he's already a lead animator.  Then he moved back to US and works in PDI Dreamwork (still my dream studio, I would read AFR for this), and he will be the head of character animation in the new film coming out in 2014.  I can only say, Damn that's cool.


AFR next!

Tuesday, January 24, 2012

Animation Reels

For 2012 Dragon year, my updated reels!
my animation reel,


my Character animation reel,


Last but not least, my game animation reel!

Tuesday, January 17, 2012

Attaching Buttons on Jacket? 4 ways to do it.

The rivet tool is very useful when attaching buttons on jackets as we saw in the tutorial.  Delano used a classic rivet tool in his course.

Since I have MAYA 2011, it comes with a new tool called Point on Poly constraint.  I was excited to try it out.  Too bad it doesn't do a nice job on keeping the orientation of my object.


As I was searching around, I found 3 tools that serve the same purpose, classic rivet tool, djx rivet tool, and surface attach tool.

So now we have 4 tools that does the same thing!  The question is which one is better.


djRivet tool : use follicles, can do multiple button constraints at once,  with good  UV layout, smoothing the poly is fine.  No need to select components, just select the buttons first, and the jacket, then type hit your shelf button.

rivet tool*1 : use locator, can only do on constraint at a time, has problem after smooth polygon.  select a component, create locator where the component is, parent constraint.

surface attach tool*2:  Feels like the rivet tool, also make a locator on the target object.  Constrain one at a time.  After poly smooth, go select cMuscleSurfAttach node, press fix button.

Point on Poly tool : create problem like above, don't like.


1*."the classic rivet script uses two edges of a mesh to create two curves, which then are lofted together, the resulting NURB is read with a pointOnSurfaceInfo and the parameter UV coords from said node define the position of a locator. He uses the pointOnSurfaceInfo node, along with a modified aim constraint, to achieve proper orientation for the locator so that it follows the orientation of the mesh face."

2*.  Its under animation tab, muscle, bonus rigging , surface attach.  If you can't see muscle menu, check if your muscle plug-in is loaded through plug-in manager.

Monday, January 16, 2012

IK handle offsetting and show all input window error

Problem 1. unwanted IK handle offsetting

When rigging the arm with IK, MAYA generate an IK handle and an effector.  Before you move the effector, make sure that the IK handle's attributes are not modified or locked, and IK handle are not grouped under any other nodes, otherwise when you attempt to move the effector, it will seem like it is locked in space, and the joint will start to offset.

Problem 2.  "All input" window is not showing, maya giving "Error: Object `row 1` not found"

This has to do with the layer that the mesh is sitting on.  Delete the layer, and save the file, reopen, problem solved.

Problem 3. change the order of attributes in MAYA

Sadly, this function is still not in the basic package of MAYA 2011.  This problem dated back in 2003(first question found on the internet).  Luckily we have a script made by comet.  It was developed for MAYA 5, but with a little tweak, it works perfectly in 2011.

This is what you have to do.
1. go download comet attribute editor. http://www.comet-cartoons.com/melscript.php
2. put the script in your script folder, in my case, C:\Users\antarlian\Documents\maya\2011\scripts
3. open it in MAYA script editor(or any other text editor), go to the end of the script, replace the cAE dropToBottom procedure to :

global proc cAE_dropToBottom(string $obj, string $attr)
{
  // renameAttr ($obj+"."+$attr) ($attr+"TEMPREN") ; // there
    // renameAttr ($obj+"."+$attr+"TEMPREN") ($attr) ; // and back again
    deleteAttr -attribute $attr $obj;
    Undo;
}

in Maya 2011, renaming an attr doesn't change the order of the attr anymore, that's why it won't work.  But if we delete the attr first, then undo, the attr will pop up at the end of the attr list.

4. run the script,  cometAttrEditor();